The other day, I talked about building an e-book for Kindle and Nook. Today, I want to add a few things to the Makefile we created so that we can produce a PDF. The end result will be that every time you want to create a PDF of the book, you will only need to type 'make pdf'.
If you're one a Mac, you'll want to install MacTeX. If you're on Linux/UNIX, you'll want to install the package that contains pdflatex. We'll be using LaTeX to typeset our book.
Converting Your HTML to TeX
When we built our e-book, we were working with our text as HTML. LaTeX doesn't work with HTML, so we need to convert our HTML into something that LaTeX can understand. Since most manuscripts don't use many of the features in HTML—mainly paragraphs and a few special characters—it's relatively easy to convert the HTML into LaTeX with a simple perl script.
Make a backup of all of your files before running this!
|
1
2
3
4
5
6
7
8
9
10
11
12
13
14
15
16
17
18
19
20
21
22
23
24
25
26
27
28
29
30
31
32
33
34
35
36
|
[expand title="html2tex.pl"]#!/usr/bin/perl
use File::Slurp;
$SOURCE=$ARGV[0];
$DEST= $SOURCE;
$DEST =~ s/\.html$/.tex/;
print "Going from $SOURCE -> $DEST\n";
my $html = read_file($SOURCE);
$html =~ s{\s*\s*\s*$}{}m;
$html =~ s{</?p>}{\n\n}g;
$html =~ s{<em>(.*?)</em>}[\\emph{$1}]sg;
$html =~ s{\n\n+}{\n\n}g;
$html =~ s{‘}{`}g;
$html =~ s{’}{'}g;
$html =~ s{“}{``}g;
$html =~ s{”}{''}g;
$html =~ s{—}{---}g;
$html =~ s{ï}{\\"i}g;
@bits = split(/\n/, $html);
shift @bits until $bits[0] =~ /^\s*$/;
$html = join("\n", @bits);
$html =~ s{<div class="centered">\* \* \*</div>}{\\sectionbreak}g;
#print $html, "\n";
open my $fout, ">", $DEST or die "Unable to open $DEST\n";
print $fout $html . "\n";
[/expand]
|
The above script will convert curly quotes, em dashes, and ï's into the LaTeX versions. It will also put a blank line between paragraphs and remove everything not within the <body/> of the HTML. There are still a few things that might need to be cleaned up, such as ellipses (. . .) being transformed into \ldots, but the script makes the job almost painless.
You'll need to make the script executable (chmod a+x html2tex.pl) and run it for each of your HTML chapters (but not your front material or table of contents or anything else in the book that isn't part of the main material or appendices): html2tex.pl ch1.html (for example -- changing ch1.html to the name of each HTML file you need to convert). You'll get ch1.tex as a result. Again, make a backup of all of your files before running this!
Things to note about LaTeX and TeX:
- Paragraphs are separated by blank lines. You can break lines as much as you want, but as long as there isn't a blank line, they will all be in the same paragraph.
- Italics are created by enclosing the italicized text within
\emph{...}. - A scene break, or section break as I call it in the script, is created by putting \sectionbreak in a paragraph all by itself.
- When typing, use the
and'to type left and right single quotes. Double them (`'') to create left and right double quotes. Don't use the quote character on the keyboard (") since it won't typeset the way you want it to. - When typing a single quote within a double quote (or a double quote within a single quote), put a small space between them with
\,(the TeX to HTML script will replace it with a non-breaking space). - When you need to put a regular non-breaking space between words, use the tilde (
~). - When you need a line break, use two backslashes (
\\).
Converting TeX to HTML
Our Kindle and Nook e-books are still needing the HTML, but I find it a lot easier to write in TeX since I don't have to worry about putting in paragraph tags and worry about character entities to get the quotes and dashes just right. To go from the TeX/LaTeX format to HTML, you can use the following script:
|
1
2
3
4
5
6
7
8
9
10
11
12
13
14
15
16
17
18
19
20
21
22
23
24
25
26
27
28
29
30
31
32
33
34
35
36
37
38
39
40
41
42
43
44
45
46
47
48
49
50
51
52
53
54
|
[expand title="tex2html.pl"]#!/usr/bin/perl
use File::Slurp;
$SOURCE=$ARGV[0];
$DEST= $SOURCE; $DEST =~ s/\.tex$/.html/;
if($SOURCE =~ /^ch(\d+)\.tex/) {
$CHAPTER = $1
}
print "Going from $SOURCE -> $DEST\n";
my $tex = read_file($SOURCE);
$tex .= "\n" unless $tex =~ /\n$/m;
$tex =~ s{\s*\\chapter.*$}{}m;
$tex =~ s{\\\\}{<br />}g;
$tex =~ s{\\,}{ }g;
$tex =~ s[\\begin{quote}][<blockquote>]g;
$tex =~ s[\\end{quote}][</blockquote>]g;
$tex =~ s[\\emph{(.*?)}][<em>$1</em>]sg;
$tex =~ s[\\ldots][. . .]g;
$tex =~ s{\\-}{}g;
$tex =~ s{%.*?\n}{}mg; # remove TeX comments
$tex =~ s{^\s*}{};
$tex =~ s{\n\n+}{\n</p><p>\n}g;
$tex =~ s{\\'e}{é}g;
$tex =~ s[\\c{c}]{ç}g;
$tex =~ s{``}{“}g;
$tex =~ s{''}{”}g;
$tex =~ s{`}{‘}g;
$tex =~ s{'}{’}g;
$tex =~ s{---}{—}g;
$tex =~ s{~}{ }g;
$tex =~ s{\\"i}{ï}g;
$tex =~ s{\\sectionbreak}{<div class="centered">\* \* \*</div>}g;
$tex =~ s[{}][]g;
open my $fout, ">", $DEST or die "Unable to open $DEST\n";
print $fout <<EOH
<!DOCTYPE html PUBLIC "-//W3C//DTD XHTML 1.1//EN"
"http://www.w3.org/TR/xhtml11/DTD/xhtml11.dtd">
<html xmlns="http://www.w3.org/1999/xhtml">
<head>
<title>Chapter $CHAPTER</title>
<link rel="stylesheet" href="style.css" type="text/css" />
</head>
<body>
<div>
EOH
if($CHAPTER) {
print $fout "<h2><b>Chapter $CHAPTER</b></h2>\n";
}
print $fout "\n<p>\n" . $tex . "</p>\n";
print $fout "</div></body></html>\n";
[/expand]
|
We'll assume for now that you put this in the same directory as the kindlegen program. You'll need to mark the script as executable (chmod a+x tex2html.pl).
Open up your Makefile from before and add the following near the top with the other variable assignments:
|
1
2
3
4
5
6
7
8
9
10
11
|
[expand title="Makefile Variables"]LATEX_PATH=/usr/texbin
TEX=novel.tex
TEX_CHAPTERS=ch1.tex ch2.tex ch3.tex
PDF=novel.pdf
.SUFFIXES: .html .tex
%.html : %.tex
$(KINDLEGEN_PATH)/tex2html.pl $(*).tex
[/expand]
|
Remember that you need a tab instead of spaces when it looks like there are spaces at the beginning of a line.
After the mobi and epub sections, you can add the following to build the PDF:
|
1
2
3
4
5
6
|
[expand title="Makefile PDF Building"]novel.pdf: $(TEX_CHAPTERS) $(TEX)
$(LATEX_PATH)/pdflatex $(TEX)
open $(PDF)
pdf: $(PDF)
[/expand]
|
Of course, you can change the filename of the PDF as long as you change it in all the places it appears (similar to changing novel.mobi or novel.epub).
Describing the Book
You've got your Makefile all set up and ready to go. Your chapters are in TeX format. You run the command to create your PDF document:
make pdfand nothing happens. What's going wrong?
We haven't created the novel.tex file referenced in the Makefile. The following is a simple one that you can use to get started.
|
1
2
3
4
5
6
7
8
9
10
11
12
13
14
15
16
17
18
19
20
21
22
23
24
25
26
27
28
29
30
31
32
33
34
35
36
37
38
39
40
41
42
43
44
45
46
47
48
49
50
51
52
53
54
55
56
57
58
59
60
61
62
63
64
65
66
67
68
69
70
71
72
73
74
75
76
77
78
79
80
81
82
83
|
[expand title="novel.tex"]%! program = pdflatex
\documentclass[10pt,twoside,draft]{book}
\usepackage[
inner=0.75in,
outer=0.75in,
top=0.75in,
bottom=0.75in,
paperwidth=6in,
paperheight=9in]{geometry}
\usepackage{fancyhdr}
\usepackage[final]{microtype}
\pagestyle{fancy}
\fancyhead{}
\fancyfoot{}
\renewcommand{\headrulewidth}{0pt}
\renewcommand{\footrulewidth}{0pt}
\linespread{1.1}
\widopenalty=10000
\clubpenalty=10000
\raggedbottom
% Change the \S to something else if you want a different
% way of marking a scene change or section break
\newcommand{\sectionbreak}{\medskip\centerline{\S}\medskip}
\begin{document}
~
\vfill
{
\centerline{\Huge\bf\lsstyle Your Title Here}
}
\vfill
\centerline{\huge Your Name Here}
\vfill
~
\vfill
~
\newpage
~
\vfill
Your copyright statement and other information about
the fictional nature of the book can go here.
It will be centered on the page.
\vfill
~
\mainmatter
\fancyhead[RO,LE]{\thepage}
\fancyhead[CO]{\emph{Your Title Here}}
\fancyhead[CE]{\emph{Your Last Name Here}}
\fancypagestyle{plain}{%
\fancyhead{}
\fancyfoot{}
\fancyhead[CO]{\emph{Your Title Here}}
\fancyhead[CE]{\emph{Your Last Name Here}}
\fancyfoot[CO]{\thepage}
\fancyfoot[CE]{\thepage}
}
\include{ch1}
\include{ch2}
% continue using \include{...} to bring in each of
% your chapters in order
\backmatter
% here you can do an optional About the Author
\chapter*{About the Author}
You are a something or other\ldots .
\end{document}
[/expand]
|
As you can tell by reading through it, there are a few places you need to change things, such as your name or the title of the book.
Looking at the Results
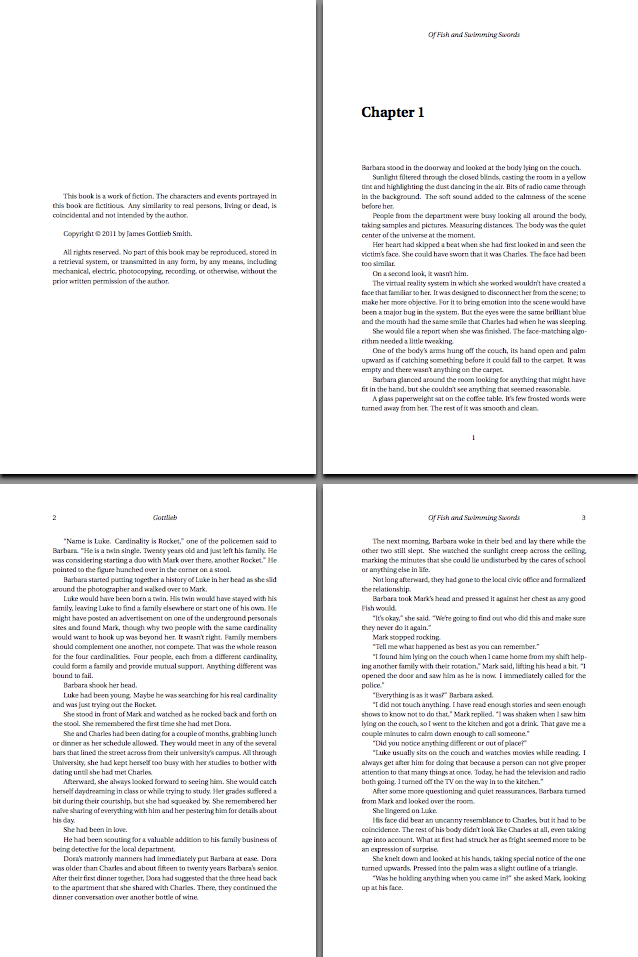
As can be expected when using LaTeX, the results are pretty good with only a little effort. The images here will look a little different than what you'll get right away because I have a few tweaks that are specific to my novel, but the general look should be similar.
My title page is very simple:

Likewise, the general feel for the first few pages, including the copyright page (the other side of the title page) with the margins as set in the novel.tex file here:

I also ran the typesetting with 1 inch margins on the top, bottom, and outside edge (change the corresponding measurements at the top of the novel.tex file):
Of course, to get the most out of LaTeX, you'll want to read up on the language and play around a bit. Keep in mind that TeX and LaTeX are designed for typesetting, not for wordprocessing. They take a typesetter's approach to the page, so always think of the pages and blocks of text as physical objects being juggled around to see what the best looking page might be and you'll be a long way to understanding LaTeX.
Typesetting beautiful books isn't difficult though once you get the patterns down. It's easy to iterate through changes until you get to something you like (for example, I think I like the 1 inch margins better than the 0.75 inch margins) without having to rework the entire book every time you make a change. And any time I make a change in a chapter, I can just run a make command and both e-books and the PDF version are rebuilt:
make epub pdf
It's hard to get simpler than that after all of the hard work in the beginning.
LaTeX Resources
